
User Tag List
Results 181 to 195 of 265
 184Likes
Thread: Year Round Recipes
-
Tue, Jun 11th, 2013, 07:05 PM #181Mastermind


- Join Date
- Jan 2012
- Location
- SOUTHERN ONTARIO
- Posts
- 23,519
- Likes Received
- 31447
- Trading Score
- 551 (100%)


http://www.buzzfeed.com/arielknutson...-ice-cube-tray
An ice cube tray is great for making miniature desserts, storing things like herbs or stock for easy use later on, and making unique ice cubes for cold drinks. Consider buying silicone ice cube trays; they make it easier to remove things when frozen. Once whatever you’re making is frozen, you can transfer the cubes to a ziplock bag for storage in the freezer. Here are some things to try.
1. Make chocolate-covered cheesecake bites.

Great for portion control. Vegan and non-vegan recipes here.
Source: damyhealth.com
2. Freeze your herbs in olive oil so they don’t go to waste.

Hard herbs like oregano, sage, thyme and rosemary work best for this. You want to pack the ice cube trays with ⅔ herbs and ⅓ olive oil. Find more information on when to use these herbs here.
Source: thekitchn.com
3. Make coffee ice cubes for your iced coffee.

No more watered-down iced coffee!
Source: foododelmundo.com
4. Make chocolate-covered strawberries.

For the one you love or just for yourself. Directions here.
Source: cheaprecipeblog.com
5. Freeze baby food for future use.

Buying baby food can be expensive. Make your own, freeze it, and then thaw it out when you’re ready to use it. More information here.
Source: helpmegrowutah.blogspot.com
6. Pretend you’re a master sushi roller by using the ice cube tray as a mold.

Blasphemous, sure, but also maybe a little bit brilliant. Recipe here.
Source: dailycandy.com
7. Freeze homemade tomato sauce.

This won’t take long to thaw in the microwave.
Source: thecomfortofcooking.com
8. Make thick smoothies out of frozen yogurt and bananas.

Freeze Greek yogurt and bananas in ice cube trays to make your smoothies super creamy AND healthy.
Source: ishouldbemoppingthefloor.com
9. Make jello shots.

Try these Blueberry Martini Jello Shots made in an ice cube tray.
Source: bionicbites.com
10. Freeze buttermilk for future use.

Never again let half a container of buttermilk go to waste (it will last up to three months frozen). Just be sure to measure out how many tablespoons of buttermilk there are in each ice cube. When you’re ready to use in a recipe, just thaw and add.
Source: rachelschultz.com
11. Make delicious slushies that won’t taste watered-down.

Freezing and blending cubes of juice means more flavor and less hassle. Try this sweet wine slushie made with wine ice cubes.
Source: wine.wonderhowto.com
12. Make your own peanut butter cups.

Recipe here.
Source: creativesimplelife.com
13. Make mini popsicles for a small treat.

Try these strawberry banana ones.
Source: whiskedfoodie.com
14. Make chocolate ice cubes and add them to vanilla milk.

A prefect way to cool off in the summer. Recipe here.
Source: thekitchn.com
15. Make ice cubes with leftover wine.

If for some reason you have leftover wine (er, never), make ice cubes for sangria or to cook with in the future.
Source: blog.pontewinery.com
16. Freeze homemade pesto for future use.

For a little bit of summer during the winter.
Source: planetforward.ca
17. Make crazy interesting cocktails.

The piña colada ice cubes are alternating layers of pineapple juice and coconut milk. Recipes here.
Source: sunset-vine.tumblr.com
18. Make hot chocolate on a stick.

These would make a cute gift for someone. Recipe here.
Source: 30poundsofapples.com
19. Freeze fruit juice and add it to seltzer water.

So good.
Source: thekitchn.com
20. Use your ice cube tray to portion out homemade cookie dough.

Next time you make cookies, bake half of them and put the rest into an ice cube tray to freeze. Then when you want something sweet, you can just take one cookie out and bake it.
Source: fitsugar.com
21. Freeze greens to add to smoothies.

Using raw greens in a smoothie is nice, but can take some extra work (and make for some weird fibrous mouthfuls) in the morning. Try cooking your greens first, puree in your food processor or blender, and freeze in ice cube trays. When you’re ready to make your smoothies, just pop in a couple green ice cubes.
Source: katymcarter.com
22. Make easy frozen yogurt.

Put yogurt in ice cube trays for a frozen yogurt treat without using an ice cream maker. Bon Appétit recommends Yoplait Whip because it maintains a fluffy texture even when it’s frozen.
Source: bonappetit.com
23. Freeze homemade chicken and vegetable stock for future use.

Only thaw what you need! It should be OK to use for up to two months.JOIN NOW WIN BIG in the Survivor Pool starting in the Spring
Season 40 Winners At War
https://forum.smartcanucks.ca/435852...a/#post7022499
-
-
Tue, Jun 11th, 2013, 07:09 PM #182One Awesome Domestic Diva


- Join Date
- Apr 2010
- Location
- Ontario
- Posts
- 12,085
- Likes Received
- 20335
- Trading Score
- 88 (100%)
i've also read if you buy extra eggs or crack a few shells by accident,you can put them into trays as well and freeze. use later in recipes or fry etc. as needed.
Be Strong
Be True
Be You.
Simple as that!
-
Wed, Jun 19th, 2013, 06:30 AM #183Mastermind
- Join Date
- Jan 2012
- Location
- SOUTHERN ONTARIO
- Posts
- 23,519
- Likes Received
- 31447
- Trading Score
- 551 (100%)
Honey Sesame Crock Pot Chicken
serves 6

Ingredients
- 2 pound boneless, skinless chicken breasts (or thighs)
- salt and pepper
- 3/4 cup honey
- 1/2 cup low-sodium soy sauce
- 1/2 cup diced onion (optional)
- 1/4 cup ketchup
- 2 tablespoons olive oil
- 2 cloves garlic, minced
- 1/4 teaspoon red pepper flakes
- 4 teaspoons cornstarch dissolved in 6 Tablespoons water
- sesame seeds
- 3 scallions, chopped (optional)
Instructions
- Lightly season both sides of chicken with salt and pepper, and place into your crock pot.
- In a medium bowl, combine honey, soy sauce, onion, ketchup, oil, garlic and pepper flakes. Pour mixture over chicken. Cook on low for 4 hours.
- Remove chicken from crock pot, but reserve sauce in the pot. Dissolve 4 teaspoons of cornstarch in 6 tablespoons of water and pour into crock pot. Stir to combine with sauce. Replace the lid and cook sauce on high for ten more minutes or until it thickens slightly.
- Shred chicken into bite size pieces. Serve chicken over cooked rice and spoon some sauce on top. Sprinkle with sesame seeds and chopped scallions.
recipe from Very Culinary via Six Sisters StuffJOIN NOW WIN BIG in the Survivor Pool starting in the Spring
Season 40 Winners At War
https://forum.smartcanucks.ca/435852...a/#post7022499
-
Sun, Jun 23rd, 2013, 07:27 PM #184Mastermind
- Join Date
- Jan 2012
- Location
- SOUTHERN ONTARIO
- Posts
- 23,519
- Likes Received
- 31447
- Trading Score
- 551 (100%)
I could not decie which thread to put this in but here goes
this wpuld be fantastic with my choc. mint mmmmmmmm

Ingredients- 8 ounces Philadelphia cream cheese, room temperature
- 8 ounces Cool Whip
- 1 cup fresh blueberries
- 1 cup fresh strawberries, chopped
- 1 cup fresh raspberries, quartered
- 1 cup fresh blackberries, quartered
- 6 fresh mint sprigs
Directions- Using a stand mixer or electric mixer, combine the cream cheese and Cool Whip. Mix for 2-3 minutes on medium speed until smooth and creamy. Set aside.
- In a large mixing bowl, combine the berries. Stir well until combined.
- Stand the push-pops up. Spoon the cheesecake mixture into a pastry bag or sealable plastic bag and snip off the tip. Pipe the cheesecake mixture into the bottom of the push-pops until 1/4 of the way full.
- Add a spoonful of the berry mixture into the push-pop containers until half-full.
- Pipe more of the cheesecake mixture into the containers until 3/4 full.
- Top with the fresh berry mixture and garnish with a mint sprig. Refrigerate until ready to serve.
http://realwomenofphiladelphia.com/r...fornia-berriesJOIN NOW WIN BIG in the Survivor Pool starting in the Spring
Season 40 Winners At War
https://forum.smartcanucks.ca/435852...a/#post7022499
-
Sat, Jul 6th, 2013, 10:09 AM #185Mastermind
- Join Date
- Jan 2012
- Location
- SOUTHERN ONTARIO
- Posts
- 23,519
- Likes Received
- 31447
- Trading Score
- 551 (100%)
 JOIN NOW WIN BIG in the Survivor Pool starting in the Spring
Season 40 Winners At War
https://forum.smartcanucks.ca/435852...a/#post7022499
-
Tue, Jul 9th, 2013, 07:54 PM #186Mastermind
- Join Date
- Jan 2012
- Location
- SOUTHERN ONTARIO
- Posts
- 23,519
- Likes Received
- 31447
- Trading Score
- 551 (100%)
i WANT TO POST THIS IN EVERY THREAD i HAVE
NEVER BUY CHOCOLATE DIPPED CONES AGAIN.... PK MAYBE NOT EVER LOL

Homemade Magic Shell
Makes 1 cup
160 grams (2 small bars) good quality chocolate
100 grams coconut oil
Note: You can make as little or as much as you want; just use two parts coconut oil to three parts chocolate. Single servings made late at night are encouraged.

Break your chocolate into pieces -- I like to do this with my hands rather than a knife to avoid wasted chocolate shards -- and add them to a microwave-safe container with your coconut oil. If your kitchen is cold and your coconut oil is solid, it will look different than this -- but it will all be the same in the end.

Microwave for 30-second intervals until your chocolate and oil have melted together. Stir well to ensure that everything is smooth, and let the mixture cool slightly before using; if it's super-hot, the shell will partially melt your ice cream. But some people are into that sort of thing.
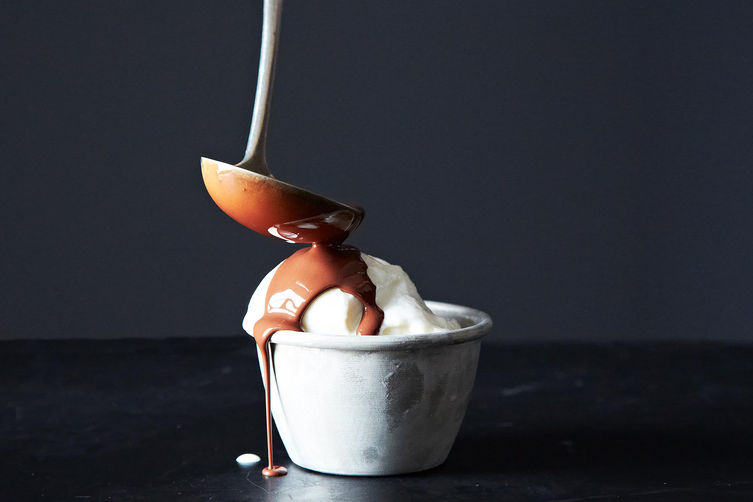
Pour magic shell over a generous scoop of your favorite ice cream.
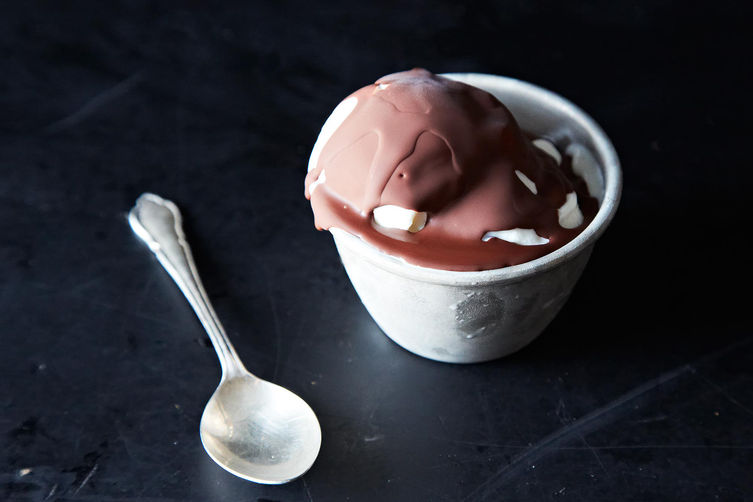
Wait. Be patient! Don't touch your spoon until the shell has hardened -- it won't take more than a minute.
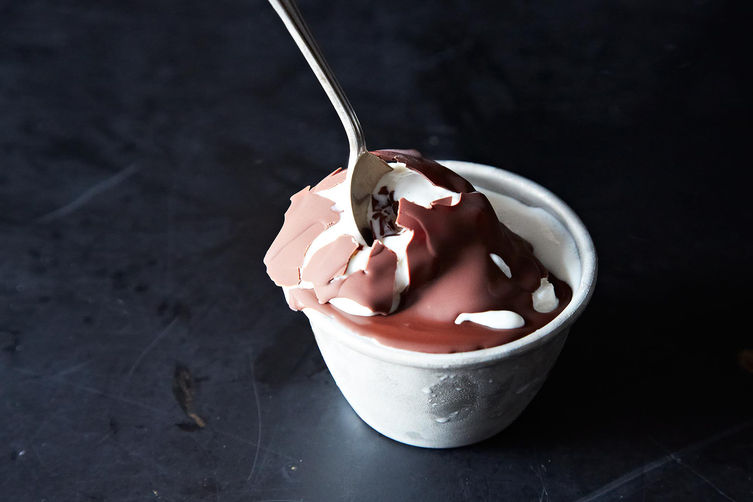
Dig in. Crack the shell. Eat every last bite. Preferably near a fan.JOIN NOW WIN BIG in the Survivor Pool starting in the Spring
Season 40 Winners At War
https://forum.smartcanucks.ca/435852...a/#post7022499
-
Tue, Jul 16th, 2013, 08:32 AM #187Mastermind
- Join Date
- Jan 2012
- Location
- SOUTHERN ONTARIO
- Posts
- 23,519
- Likes Received
- 31447
- Trading Score
- 551 (100%)

Baked Beans
What you need:
- 475 ml navy beans
- 226.8 grams bacon
- 1 onion, finely diced
- 45 ml molasses
- 30 ml salt
- 1 ml ground black pepper
- 1 ml dry mustard
- 120 ml ketchup
- 15 ml Worcestershire sauce
- 60 ml brown sugar
How to prepare:
- Soak beans overnight in cold water. Simmer the beans in the same water until tender, approximately 1 to 2 hours. Drain and reserve the liquid.
- Preheat oven to 325 degrees F (165 degrees C).
- Arrange the beans in a 2 quart bean pot or casserole dish by placing a portion of the beans in the bottom of dish, and layering them with bacon and onion.
- In a saucepan, combine molasses, salt, pepper, dry mustard, ketchup, Worcestershire sauce and brown sugar. Bring the mixture to a boil and pour over beans. Pour in just enough of the reserved bean water to cover the beans. Cover the dish with a lid or aluminum foil.
- Bake for 3 to 4 hours in the preheated oven, until beans are tender. Remove the lid about halfway through cooking, and add more liquid if necessary to prevent the beans from getting too dry.
JOIN NOW WIN BIG in the Survivor Pool starting in the Spring
Season 40 Winners At War
https://forum.smartcanucks.ca/435852...a/#post7022499
-
Tue, Jul 16th, 2013, 09:46 PM #188Mastermind
- Join Date
- Jan 2012
- Location
- SOUTHERN ONTARIO
- Posts
- 23,519
- Likes Received
- 31447
- Trading Score
- 551 (100%)


Mexican Lasagna Roll-Ups
Source: Emily Bites Original
Ingredients:
8 uncooked lasagna noodles
8 oz 1/3 less fat cream cheese, softened to room temperature
½ cup fat free plain Greek yogurt
6 teaspoons chili powder, divided
2 teaspoons cumin, divided
1 ½ teaspoons garlic powder, divided
1 teaspoon onion powder
1 cup shredded cooked chicken breast
½ cup canned black beans, drained and rinsed
½ cup corn kernels (fresh or frozen and defrosted)
15 oz can crushed fire-roasted tomatoes (if you can only find diced fire-roasted tomatoes, don’t fret! You can pour them in a bowl and break them down in a few seconds using an immersion blender like I did or just toss them in a blender or food processor and pulse a few times to smooth them out a bit)
8 oz can tomato sauce
1 teaspoon salt
2 teaspoons dried oregano
2 oz 50% reduced fat sharp cheddar, shredded (I used Cabot 50% sharp)
Optional: sliced scallions for garnish if desired

Directions:
1. Pre-heat the oven to 350 degrees. Set aside a 9x13 baking dish.
2. Cook lasagna according to package instructions. Drain and lay out to dry individually on parchment paper.
3. While the water is boiling for step one, combine the cream cheese and yogurt in a mixing bowl and stir until well combined. Add 3 teaspoons of the chili powder, 1 teaspoon of the cumin, ½ teaspoon of the garlic powder and the 1 teaspoon of onion powder and mix well. Mix in the shredded chicken, black beans and corn and stir until combined. Set aside.
4. In a separate mixing bowl, combine the crushed fire-roasted tomatoes and tomato sauce with the remaining 3 teaspoons of chili powder, teaspoon of cumin, teaspoon of garlic powder, salt and oregano and stir together. Set aside.
5. When the noodles are no longer wet and are cooled enough for you to touch them, spoon 1/3 cup of chicken filling from the first mixing bowl onto each noodle and spread evenly down the middle of the noodle. Starting with one end, roll each noodle over the filling until it forms a complete roll.
6. Spread about ¾ cup of the tomato sauce from the second mixing bowl across the bottom of the baking dish from step 1. Place each of the 8 lasagna rolls seam-side down on top of the sauce in the dish. Spoon the remaining tomato sauce over the top of the lasagna rolls and sprinkle the shredded cheddar over the tops. Cover the dish with aluminum foil and bake for 40 minutes until heated through.
Yields 8 lasagna roll-ups. WW P+: 7 per roll-up (P+ calculated using the recipe builder on weightwatchers.com)
Nutrition Information per roll-up from myfitnesspal.com: 271 calories, 31 g carbs, 9 g fat, 17 g protein, 4 g fiberJOIN NOW WIN BIG in the Survivor Pool starting in the Spring
Season 40 Winners At War
https://forum.smartcanucks.ca/435852...a/#post7022499
-
Sun, Jul 21st, 2013, 05:50 PM #189Mastermind
- Join Date
- Jan 2012
- Location
- SOUTHERN ONTARIO
- Posts
- 23,519
- Likes Received
- 31447
- Trading Score
- 551 (100%)
 http://www.raininghotcoupons.com/5-w...rn-on-the-cob/
1- Go gourmet. Grill or oven bake corn with exciting flavor combinations to achieve restaurant worthy cobs. Husk and rinse the corn and place on a square of aluminum foil. Add different spices, herbs and veggies on top and completely wrap in foil. Try combinations like bacon and jalapeno, garlic and butter or lime juice and salt. Cook on the grill for 10-15 minutes or bake it in the oven for 30 minutes at 350 degrees.
2- Make corn salsa. This is a great salsa that will pair well with chips, on top of tacos and even next to a great grilled steak. Try this recipe to get you started.
You will need:
-1 cup fresh & cooked corn (grilled or baked and cut from the cob, about two cobs)
-2 cups diced tomatoes
-1/2 cup diced onion
-1 tablespoon diced jalapeno
-1 tablespoon chopped fresh cilantro
-2 tablespoons lime juice
-salt and pepper to taste
Wash veggies and cilantro to prep, then dice. Combine all ingredients and toss together until blended well.
3- Try “Corn-kabobs.” Cut fresh cobs of corn in two inch increments to add to skewers. Alternate corn with smoked sausage, red and green bell peppers and onions to complete the dish.
4- Wake up an everyday salad of lettuce or spinach with fresh cooked corn, cut from the cob. Add avocado, crumbled bacon, feta cheese and lime juice to complete it. This combo is far from the dominating world of ranch and Italian dressing covered salads.
5- Bake corn bread casserole. This dish is easy, delicious and sure to be a crowd pleaser. This casserole never lasts long in my house and couldn’t be easier.
You will need:
-1 box of jiffy cornbread mix
-1 can creamed corn
-kernels from one cooked cob of corn
-1 stick of butter, melted
-2 tablespoons milk
–1/2 cup of shredded cheddar cheese
Combine the cornbread mix, creamed corn, corn kernels, butter and milk until blended well. Bake in a casserole dish at 375 degrees for about 25 minutes or until edges are brown. Remove from oven, top with cheese and enjoy!JOIN NOW WIN BIG in the Survivor Pool starting in the Spring
Season 40 Winners At War
https://forum.smartcanucks.ca/435852...a/#post7022499
-
Wed, Jul 24th, 2013, 06:39 AM #190Mastermind
- Join Date
- Jan 2012
- Location
- SOUTHERN ONTARIO
- Posts
- 23,519
- Likes Received
- 31447
- Trading Score
- 551 (100%)
 http://www.creamofwheat.com/recipes/...hie#ingredient
Banana Smoothie
Makes 2 (1-cup) servings.
- 1 packet CREAM OF WHEAT Cinnamon Brown Sugar Instant Hot Cereal
- 2/3 cup water, boiling
- 1 large bananas
- 1 cup ice, cubes
- 1 teaspoon honey, optional
- PLACE cereal and boiling water in electric blender container; cover. Blend on low speed 1 minute. Add banana; blend an additional 30 seconds.
- ADD ice and honey; cover. Blend on high speed until smooth. Serve immediately.
JOIN NOW WIN BIG in the Survivor Pool starting in the Spring
Season 40 Winners At War
https://forum.smartcanucks.ca/435852...a/#post7022499
-
Sat, Jul 27th, 2013, 01:43 PM #191Mastermind
- Join Date
- Jan 2012
- Location
- SOUTHERN ONTARIO
- Posts
- 23,519
- Likes Received
- 31447
- Trading Score
- 551 (100%)
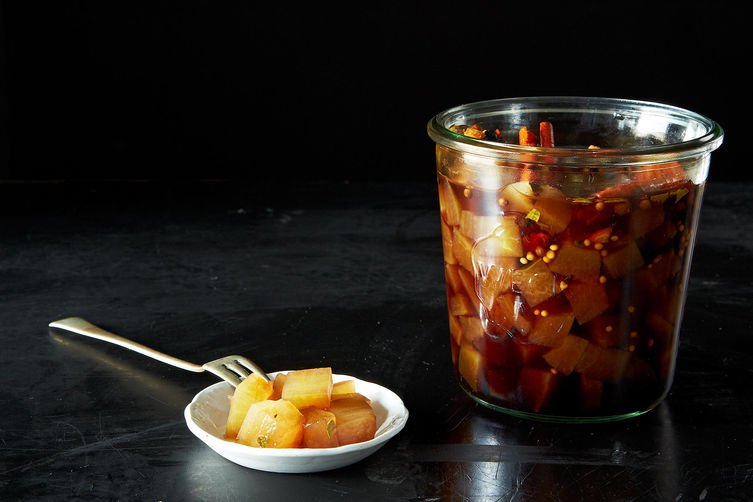
Spicy, Savory & Sweet Watermelon Rind Pickles
Makes 4 quarts
- 12 cups watermelon rinds prepared as in step 1 below
- 3 cups granulated sugar
- 1 1/2 cup apple cider vinegar
- 1/2 cup balsamic vinegar
- 1 cup white vinegar
- 4 tablespoons mixed pickling spice
- 1 tablespoon whole black peppercorns
- 12 whole cloves
- 8 thin slices of fresh ginger cut into strips about 2-inches long by 1-inch wide
- 3 cinnamon sticks, broken into 1-inch pieces
- 2 teaspoons whole allspice
- Wash and cut away all green parts of the rinds, Cut away any red as well. Cut into cubes 1-inch by 1-inch pieces or with a cute flower mini cutter (that is what I use when I gift these).
- Place cut rind pieces in a large stock pot filled with enough water to cover rinds and cook over high heat until boiling. Reduce the heat to medium and continue to cook until rinds are fork tender or for about 20 minutes. Remove from heat, drain and set aside.
- While the rinds cook, in a medium large sauce pan, add in all the other ingredients and simmer over medium heat for 15 minutes. Remove from heat and allow to pickling broth to slightly cool.
- Place the cooked rinds in a large container that comes with tight filling lid. Pour the pickling broth over to completely cover and allow to completely cool. Place in the refrigerator and use as wanted. This will keep well for 3-4 months.
JOIN NOW WIN BIG in the Survivor Pool starting in the Spring
Season 40 Winners At War
https://forum.smartcanucks.ca/435852...a/#post7022499
-
Thu, Aug 1st, 2013, 07:47 AM #192Mastermind
- Join Date
- Jan 2012
- Location
- SOUTHERN ONTARIO
- Posts
- 23,519
- Likes Received
- 31447
- Trading Score
- 551 (100%)

Blow your MIND" Tomato Basil Pasta! - No Straining, just Stirring
Pasta, Tomatoes, Veggie Broth, Olive Oil, and Seasonings (details below)
Throw it all in the pot, INCLUDING the uncooked Pasta, and cook! - Bring it to a boil, then reduce to a simmer. The starch leaches out of the pasta and makes a rich, warm sauce for the noodles. The other ingredients cook right along with the pasta
Ingredients
12 ounces pasta (I used Linguine)
1 can (15 ounces) diced tomatoes with liquid ( I used zesty red pepper flavor)
1 large sweet onion, cut in julienne strips
4 cloves garlic, thinly sliced
1/2 teaspoon red pepper flakes
2 teaspoons dried oregano leaves
2 large sprigs basil, chopped
4 1/2 cups vegetable broth (regular broth and NOT low sodium)
2 tablespoons extra virgin olive oil
Parmesan cheese for garnish
Directions
Place pasta, tomatoes, onion, garlic, basil, in a large stock pot. Pour in vegetable broth. Sprinkle on top the pepper flakes and oregano. Drizzle top with oil.
Cover pot and bring to a boil. Reduce to a low simmer and keep covered and cook for about 10 minutes, stirring every 2 minutes or so. Cook until almost all liquid has evaporated – I left about an inch of liquid in the bottom of the pot – but you can reduce as desired .
Season to taste with salt and pepper , stirring pasta several times to distribute the liquid in the bottom of the pot. Serve garnished with Parmesan cheese.JOIN NOW WIN BIG in the Survivor Pool starting in the Spring
Season 40 Winners At War
https://forum.smartcanucks.ca/435852...a/#post7022499
-
Thu, Aug 1st, 2013, 09:54 AM #193Mastermind
- Join Date
- Jan 2012
- Location
- SOUTHERN ONTARIO
- Posts
- 23,519
- Likes Received
- 31447
- Trading Score
- 551 (100%)
 JOIN NOW WIN BIG in the Survivor Pool starting in the Spring
Season 40 Winners At War
https://forum.smartcanucks.ca/435852...a/#post7022499
-
Fri, Aug 2nd, 2013, 07:42 AM #194Mastermind
- Join Date
- Jan 2012
- Location
- SOUTHERN ONTARIO
- Posts
- 23,519
- Likes Received
- 31447
- Trading Score
- 551 (100%)

>> https://www.facebook.com/LoseItWithAlexzandra
Comfort Breakfast Bake! MMMMHMMM!
(recipe from Rocking Lion)
5 eggs (go for cage free, vegetarian fed – no beak-less chickens here!)
1/4 cup milk
16 oz refrigerated breakfast biscuits (I used the Pillsbury flakey kind)
4 scallions (green onions, spring onions, whatever you prefer to call them)
1 cup shredded extra sharp cheddar cheese
If you’re into the meats – cooked center cut bacon or cooked sausage
11×17 pan, sprayed with cooking spray (Note: I think a 9×13 works better, but might need to bake a little longer)
1. Mix your eggs and milk in a large bowl. Cut each biscuit (I’m all about scissors in the kitchen) into fours and add it to the bowl. I like to do this before I cook the bacon or cut up the scallions – give the biscuits some time to really soak in the eggs.
2. Cut up your scallions, shred your cheese, cook and break up your bacon (or sausage). Add everything to the bowl. Re: the cheese – my home economist mother tells me that pre-shredded cheese is coated with something or other to keep it from clumping. A. Gross, B. If you shred it yourself it will melt better.
3. Mix it all up and pour into your pan. Bake at 350 for 25 minutes (make sure it isn't runny – mine this morning took 28 mins).JOIN NOW WIN BIG in the Survivor Pool starting in the Spring
Season 40 Winners At War
https://forum.smartcanucks.ca/435852...a/#post7022499
-
Mon, Aug 5th, 2013, 11:41 AM #195
These look sooooo good!
 Send PM


Thread Information
Users Browsing this Thread
There are currently 1 users browsing this thread. (0 members and 1 guests)
