
User Tag List
Results 286 to 300 of 344
 651Likes
Thread: Money saving tips and tricks
-
Mon, Aug 26th, 2013, 05:25 PM #286Holly0524


- Join Date
- Oct 2011
- Location
- Edmonton, AB
- Posts
- 54
- Likes Received
- 24
- Trading Score
- 43 (100%)

I'm so going to do this one!
-
-
Sat, Aug 31st, 2013, 07:10 PM #287Mastermind


- Join Date
- Jan 2012
- Location
- SOUTHERN ONTARIO
- Posts
- 23,678
- Likes Received
- 31550
- Trading Score
- 551 (100%)


Sugar Wax – An Ancient Arabic Beauty Secret
ngredients: Sugar, white or brown (1 cup)
Water (2 Tbsp)
Lemon juice (1.5 Tbsp)
Salt, optional (1 tsp)
Combine these above natural ingredients in a saucepan and simmer on low heat. Allow the mixture to thicken and turn golden-brown. (Just like freshly baked cookies you know it’s good when it’s golden-brown.)
Stir the mixture with a spoon, making sure the sugar crystals dissolve. Within roughly eight minutes, it will thicken considerably and take on a syrupy consistency. Be careful not to let it burn.
Watch as the mixture turns a darker brown, turn off the heat, and let the forming wax cool for a couple of minutes.
And voilà (as this is also called Parisian waxing), there you have your wax. Apply where desired and pull in the opposite direction of hair growth. The wax is totally reusable so stick the leftover portion in plastic and put it in the fridge. 10 seconds in the microwave will be enough when you want to use it later.
Last edited by Anna Michele; Sat, Aug 31st, 2013 at 07:12 PM.
JOIN NOW WIN BIG in the Survivor Pool starting in the Spring
Season 40 Winners At War
https://forum.smartcanucks.ca/435852...a/#post7022499
-
Sat, Aug 31st, 2013, 07:35 PM #288Mastermind
- Join Date
- Jan 2012
- Location
- SOUTHERN ONTARIO
- Posts
- 23,678
- Likes Received
- 31550
- Trading Score
- 551 (100%)
 http://www.glamgirl.co.in/2012/11/diy-eyecream-tutorial.html?m=1
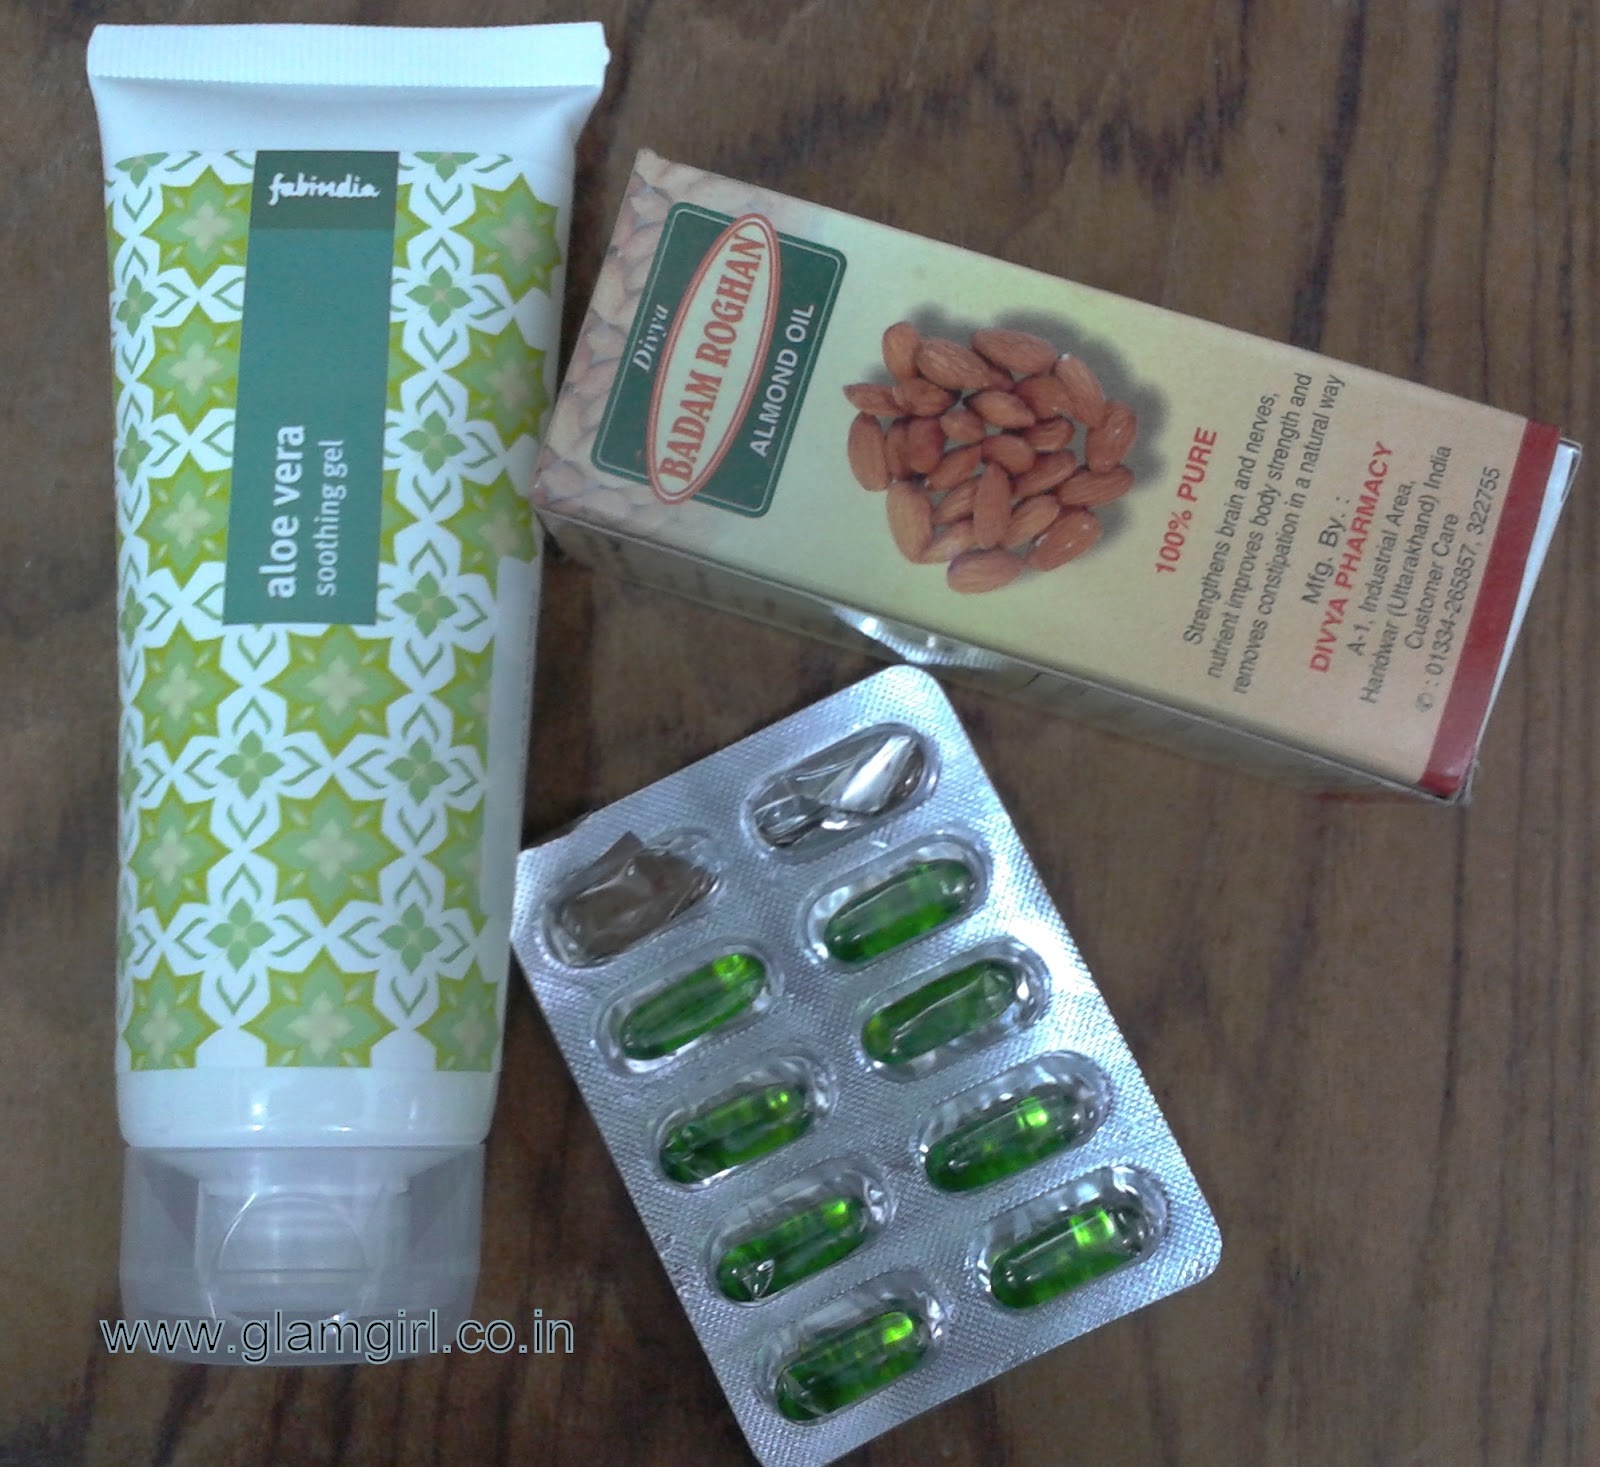
You need:
- Aloe vera gel,
- Vitamin E capsules, and
- Almond oil

Step 1: Aloe vera is used for almost all the skin problems like sunburn, tanning, uneven skin tone. Here I am using Fabindia aloe vera gel. Take full 2 tsp of aloevera gel in a jar.Steo 2: Now squeeze 3 vitamin E capsules in it.Step 3: Almond oil is also rich in nutrition for skin. Add 1 tsp of almond oil in it. If you feel its not greasy enough then you can increase or decrease the quantity according to your choice.Step 4: Mix it with fork.
After mixing all the ingredients well you will see that the cream's color has changed, it's no more transparent. Now your eye cream is ready and your dark circles won't last long.

I have swatched the eye cream on my hand .

Usage:
Apply it every night before going to bed. It will sooth and give cooling effect to your eyes, after all days tiring work it will make you feel relaxed and last but not the least, reduce dark circles.JOIN NOW WIN BIG in the Survivor Pool starting in the Spring
Season 40 Winners At War
https://forum.smartcanucks.ca/435852...a/#post7022499
-
Sun, Sep 1st, 2013, 01:55 PM #289Mastermind
- Join Date
- Jan 2012
- Location
- SOUTHERN ONTARIO
- Posts
- 23,678
- Likes Received
- 31550
- Trading Score
- 551 (100%)
DIY TEMPORARY TATTOOS
Use a gel pen in a dark color to draw the design. The free-flowing ink in gel pens will transfer readily from the paper to your skin once the design is in place. Simply draw your design on paper such as tracing paper or parchment paper using a pencil, then color in thoroughly using the gel pen. Use as much ink on one line as you can, but there is no need to make a river of ink!
http://www.wikihow.com/Create-Your-Own-Temporary-Tattoo

JOIN NOW WIN BIG in the Survivor Pool starting in the Spring
Season 40 Winners At War
https://forum.smartcanucks.ca/435852...a/#post7022499
-
Sun, Sep 1st, 2013, 02:22 PM #290Canadian Guru

- Join Date
- Nov 2011
- Location
- like the name says
- Posts
- 10,408
- Likes Received
- 15275
- Trading Score
- 159 (100%)
Have you done this yourself Anna? I either use the microwaveable version or get it done at a salon (which is $$). I think shared wax pots are disgusting and sugar is so much more hygienic
 Originally Posted by Anna Michele
 Apply every possible promo code to your cart, at every store that you visit (and get points for cash back on top of that?). It's sweet and easy with HONEY.
Always use Ebates and get cash back at over 600 online stores! Use this link to get $5, FREE
-
Sun, Sep 1st, 2013, 02:23 PM #291Mastermind
- Join Date
- Jan 2012
- Location
- SOUTHERN ONTARIO
- Posts
- 23,678
- Likes Received
- 31550
- Trading Score
- 551 (100%)
no but i'm gonna
JOIN NOW WIN BIG in the Survivor Pool starting in the Spring
Season 40 Winners At War
https://forum.smartcanucks.ca/435852...a/#post7022499
-
Mon, Sep 2nd, 2013, 09:09 PM #292Mastermind
- Join Date
- Jan 2012
- Location
- SOUTHERN ONTARIO
- Posts
- 23,678
- Likes Received
- 31550
- Trading Score
- 551 (100%)
 JOIN NOW WIN BIG in the Survivor Pool starting in the Spring
Season 40 Winners At War
https://forum.smartcanucks.ca/435852...a/#post7022499
-
Tue, Sep 10th, 2013, 01:36 PM #293Mastermind
- Join Date
- Jan 2012
- Location
- SOUTHERN ONTARIO
- Posts
- 23,678
- Likes Received
- 31550
- Trading Score
- 551 (100%)
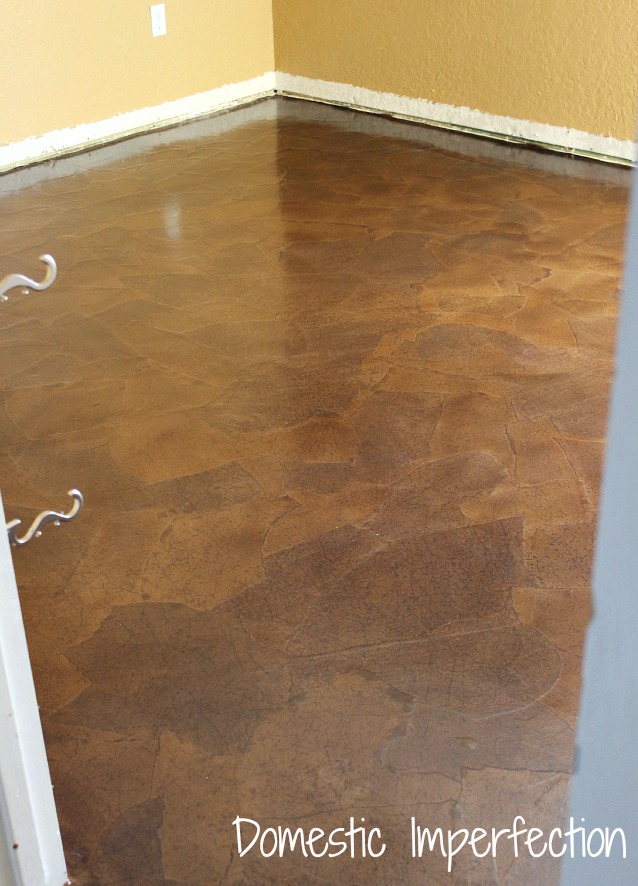
http://www.domesticimperfection.com/...rs-a-tutorial/
You will need… (these are links)
- A roll of brown paper. I bought this “builders paper” from Home Depot (cause I didn’t plan ahead), but most people recommend this Kraft paper from Amazon
- A gallon of Elmers glue
- Oil based stain (I used one quart for a 10 X 12 room). I used this one by Minwax, in “provincial”
- Water based floor polyurethane, I used this one by Rust Oleum
- Something to apply the stain and polyurethane, I used a 9′ Shur-Line “deck pad” and “mopped” it on
If you are doing this on a wood floor then that is all you need, if you are doing this on concrete than you may also need…
- a small amount of concrete to patch holes from carpet tacks
- a pole sander and sandpaper
Last edited by Anna Michele; Tue, Sep 10th, 2013 at 02:17 PM.
JOIN NOW WIN BIG in the Survivor Pool starting in the Spring
Season 40 Winners At War
https://forum.smartcanucks.ca/435852...a/#post7022499
-
Fri, Sep 13th, 2013, 09:29 AM #294Mastermind
- Join Date
- Jan 2012
- Location
- SOUTHERN ONTARIO
- Posts
- 23,678
- Likes Received
- 31550
- Trading Score
- 551 (100%)
REUSABLE PAPER TOWEL
Posted by: Kris
Supplies (for one towel):
Basic sewing supplies
Cotton print, 11.5 x 11.5
Terry cloth, 11.5 x 11.5
Plastic snaps and the assembly/installation tools update: I got my snaps here.
Coordinating thread
http://thatshortgirlsblog.blogspot.c...-tutorial.html

JOIN NOW WIN BIG in the Survivor Pool starting in the Spring
Season 40 Winners At War
https://forum.smartcanucks.ca/435852...a/#post7022499
-
Fri, Sep 13th, 2013, 10:00 AM #295Mastermind
- Join Date
- Jan 2012
- Location
- SOUTHERN ONTARIO
- Posts
- 23,678
- Likes Received
- 31550
- Trading Score
- 551 (100%)

This maybe my favorite little home-keeping pearl of wisdom ever. I love my swiffer. It's so easy to use and lightweight and it picks up every little bit of everything from every nook and cranny of my floors. With 2 cats running around here now, I can easily use it 4 or 5 times a day.
The only problem with that is that those little disposable cloths that you buy for it can really add up quickly. But not any more! Here's how I make my own cloths to reuse. They really work just as well!

All you need is some kind of basic fleece fabric. I just used an old scarf in happy colors that I thought would look cute on my swiffer, but if you went to the fabric store and picked up half a yard of whatever fleece, that would make you about a gazillion cloths.

Next the only real step to this "project" is to cut your pieces of fleece to the right size. You can use an actual swiffer cloth to measure or you can just kind of eyeball it by wrapping it around the swiffer. You can see I'm not a perfectionist about it at all.

The little grabby things on the swiffer are super forgiving. As long as your pieces are sorta kinda the right size, you're good!
So do they really work? That's the question.
Well, this is after about 30 seconds of trying out my new cloths.
 http://www.creeklinehouse.com/2013/01/make-your-own-reusable-swiffer-cloths.html?_szp=400714
JOIN NOW WIN BIG in the Survivor Pool starting in the Spring
Season 40 Winners At War
https://forum.smartcanucks.ca/435852...a/#post7022499
-
Tue, Sep 17th, 2013, 08:59 PM #296Mastermind
- Join Date
- Jan 2012
- Location
- SOUTHERN ONTARIO
- Posts
- 23,678
- Likes Received
- 31550
- Trading Score
- 551 (100%)

Bottle cap candles - burn 1 to 1.5 hours, great for travel or to use when you're entertaining on the deck at night!JOIN NOW WIN BIG in the Survivor Pool starting in the Spring
Season 40 Winners At War
https://forum.smartcanucks.ca/435852...a/#post7022499
-
Fri, Sep 20th, 2013, 08:15 PM #297Mastermind
- Join Date
- Jan 2012
- Location
- SOUTHERN ONTARIO
- Posts
- 23,678
- Likes Received
- 31550
- Trading Score
- 551 (100%)
DIY REUSABLE "DRYER SHEETS"
What you need:
Sponges
Seal-able container
Fabric softener
Water
http://themamasgirls.com/reusable-dr...-softener-diy/

JOIN NOW WIN BIG in the Survivor Pool starting in the Spring
Season 40 Winners At War
https://forum.smartcanucks.ca/435852...a/#post7022499
-
Fri, Nov 1st, 2013, 01:13 PM #298
You are all so clever.
Soap savings: I love Dr. Bronners peppermint soap as it has no additives and nasty junk in it. The bars are so pricy and the straight liquid is too strong. I have been putting it in a squeeze bottle diluted to 6x the amount of water. Perfect! The bottle ends up lasting about 3 months with daily showers and is only about $2.50/month.
-
Sat, Nov 2nd, 2013, 12:15 AM #299Canadian Genius


- Join Date
- Jan 2009
- Location
- Somewhere over the rainbow
- Posts
- 6,751
- Likes Received
- 4625
- Trading Score
- 86 (100%)
We use dryer balls. No chemicals, and dries the clothes faster. We love them and cheaper than any other alternative. Originally Posted by Anna Michele
-
Sun, Nov 10th, 2013, 05:22 PM #300Mastermind
- Join Date
- Jan 2012
- Location
- SOUTHERN ONTARIO
- Posts
- 23,678
- Likes Received
- 31550
- Trading Score
- 551 (100%)
http://www.onegoodthingbyjillee.com/...yer-balls.html
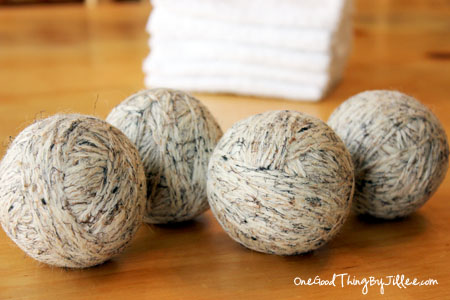
How to Make a Wool Dryer Ball:
Start with a skein of 100% WOOL yarn. (This cost me about $5 and I got four balls out of it.)

To start your ball, wrap the yarn around your fingers about 20 times and then slip it off and wrap the yarn around the middle of that circle you just made about 20 more times.

Now pinch the beginnings of your yarn ball together and keep wrapping! Make sure you wrap it nice and tight.

Pretty soon you will have something that looks like this. Tuck the end of the yarn under some of the other strands of yarn to secure.
Repeat above steps until you’ve made 4 or more balls.

Now you are ready to give them the “felting” treatment. You are going to need one leg of a pair of pantyhose or tights. Put the first ball into the toe of the pantyhose and secure it there with a piece of embroidery floss or acrylic yarn. Do NOT use wool yarn, you don’t want this to felt.
Toss the pantyhose “snake” into the washer (the hotter the water the better) and then into the dryer (again, the hotter the better. Speeds up the felting process.)

This is how they will look after the first felting. The fibers have fused and it’s much smoother and tighter.

At this point you can do another layer of yarn and “felt” again if you want a larger sized ball. I chose to leave mine as is. Keep in mind they will get slightly smaller over time as they continue to felt.

You just made your own wool dryer balls! Go ahead, give them a spin! If you want, you can even add a couple of drops of essential oil to the balls before you throw them in the dryer. I used 1 – 2 drops of lavender on each one and my clothes came out smelling sooooooo nice!!! I think the scent should last through several loads!JOIN NOW WIN BIG in the Survivor Pool starting in the Spring
Season 40 Winners At War
https://forum.smartcanucks.ca/435852...a/#post7022499
 Send PM


Thread Information
Users Browsing this Thread
There are currently 1 users browsing this thread. (0 members and 1 guests)
